Room: ROCKET - Guide
ROCKET LEAGUE – Guide to Map Awareness
This guide is meant for advanced players who understand the basic principles of the game, have satisfactory knowledge of the car and its controls and possess the sufficient skills in boost management, ball control and related basics and mechanics.
Map awareness as a term is broad; it can translate to multiple different things for other players. This guide classifies and breaks map awareness down to following categories: Ball awareness, awareness of other players, current and future situational awareness and discusses them on a vague level. The purpose of this guide is to provide food of thought for players on how to improve their map awareness, as the author estimates such skill cannot be molded into 101 guide for dummies.
Getting Started, Ball awareness
The first fundamental aspect of map awareness is understanding where the ball is currently and where it will travel, and assessing the situation regarding what happens to the ball next. Now, assuming you’ll have a clear image of the balls position, speed and its travel line for minimum of 3 seconds in advance if we remove the factor of anyone touching the ball while it travels, one understands the basic concept of ball awareness. Essentially, if broken down to level, player knows and is capable of assuming a correct position on the map prior hand in order to perform actions demanded for the situation.
This is the simplest form of map awareness and typically something one masters during time, and does not require additional effort in learning. In case you have trouble predicting the balls travel lines, especially regarding the bounces, here are few tools and tips that simplify the process and may assist you in learning the basics:
The ball does not possess a magnus effect, it never changes its direction on x-axis in the air, few odd bounces caused by the ball colliding with an object may cause the ball to swerve from its original direction slightly, but unless the ball bounces repeatedly on the ground you can be relatively confident of its current travel line. In addition, the ball follows straight-forward “fake” physics, but you can use real life ball behavior as a basis, depending on the speed and the angle of the shot it is not difficult to predict its travel line. In case you have difficult time with the corners and the walls, try heading to freeplay-mode and take powershots to the walls. Just observe where the ball is, and attempt to paint an image in your head where it will travel, if the image painted does not at least semi-accurately match the reality, keep throwing it on walls from angles, positions and speeds you have difficult time predicting it, as it’s merely a game of prediction, and in case your subconscious is incapable of predicting where its headed after multiple hours played, it means you have not paid enough attention to it. After time you personally find to be enough, head for the real games and pay attention to the ball. Consciously draw the image of the balls travel line in your head whilst the game is on-going. This may hurt your gameplay and cause unnecessary distraction at first, but later on once you feel confident you no longer need to do so, it’s more than likely it’ll come out of your spine and you have learned the basics of ball awareness, which will now naturally improve during time.
First step towards clarity, player awareness
Player awareness is one of the fundamental tools that separates the most skilled players from others. The capability to see and predict not only the ball on the field, but other players, their positions and current momentum is equally important.
The basic form is to know the locations of the players on the map, this can only be learned through observation; if you do not pay attention to their positions at the start, you’ll never subconsciously use that to your advantage in your play. As Rocket League is a fast-paced game of momentum, knowing the location of each player on the map needs to be something that comes to you automatically, as a player will not have the time to put any effort of thought to it during gameplay. However, in order to master player awareness you have to start from scratch:
Forget the ball, you should at this point know where it’s headed if it remains untouched, you should be capable of hitting a desired result in case you go for the ball, you no longer should be forced to pay constant attention to it. Now, making difficult shots typically does require extreme precision that comes from the focus, but we are going to start with the basic timing of player awareness. There are brief or longer windows of opportunity to check the map. At first you’ll have to pay attention to the following things:
Location of all players on the map and the directions of their cars (which way is the car’s front) and their current momentum (is the car standing still, driving and if so at which speed). In case you are struggling with this, try adding swiveling the camera to your arsenal and take advantage of the rear-view button (it is advisable to re-bind it to somewhere for easier access, as example L1).
The windows of opportunity come when there is no one touching the ball at the current moment, so the ball does not require your immediate attention. Now, you should be capable of quickly assess the situation consciously where all the players are, their directions and momentum, and answer the following question: Who is in position and momentum wise most likely to reach the ball first? We will analyze the result of this question in situational awareness part of the guide, but first we’ll focus on the subject at hand: It is crucial for the sake of teamplay and predicting the games overall momentum that you are completely aware of who hits the ball next. Mastering player awareness comes in steps, you cannot learn it as a complete image at once, so at first pay attention to that single detail, once you feel confident you can answer the question correctly majority of the time, move forward with the guide.
Once it becomes a reflex for you to take occasional glance at the map to tell yourself the locations of the players, their directions and momentum you can become confident regarding your basic player awareness. The advanced form is predicting player behavior and where they will be in brief amount of time based on their positions, momentum and directions of their cars. At which stage player awareness becomes more of a social science; there is no absolute definite truth, and mistakes in prediction will happen often. This will be discussed more on later stage.
In the advanced form of player awareness, you are capable of predicting somewhat the next move of all the players around you, assisting you in deciding your next move: in either positioning yourself correctly, grabbing more boost or any action that prepares you for what is to happen next, assuming you will not be the one heading for the ball. If you are headed for the ball, player awareness will assist you in making choices; Where you’ll want the ball to travel, can you make a pass or do you have an open shot at the goal, is someone challenging your play or were you not about to go for the ball but notice the other players skipping the opportunity to head for the ball, or will they go for the ball regardless, positioning themselves to intercept your move in the near future. Player awareness improves during time, as the current “meta” possesses a rather standard and predictable forms of play. The rotations and positioning are relatively standard, and if somebody breaks from the mold it is easier to figure out the player’s plans in case you are completely aware of the player’s location, direction and momentum.
Naturally, this is on theoretical level, but it will assist you in gaining the tools to be used in practice. Mastering player awareness comes when you know where the players are on the field and where they’ll head next without giving it a second thought. You can use this to your advantage in every situation of the game.
Current and future situational awareness
As a break down current situational awareness focuses on current situation and what happens at the next ball touch and is used to prepare yourself for that, whilst future situational awareness is used to provide you with clues on what happens in the near future based on map awareness.
When you possess confident level of ball and player awareness, you can start honing the image of complete map awareness. It starts from the current situational awareness, you can estimate with precision who has the ball first, and are capable of using that your advantage in positioning yourself correctly. Good example is blocking opponents shot: You’ll know the timing of when he’ll land a hit on the ball, based on his direction towards the ball you are capable of moving yourself into correct position for the block (you estimate the balls travel line), and judging from the opponents speed you can predict the timing for a successful block. The further you can estimate the situation, the further away from the ball you can perform a successful block.
Current situational awareness is a tool that paints you a complete image of what is happening in the game currently, and helps you adjust your game to predict the upcoming events (provides the necessary tools for future situational awareness). It does not provide you with accurate view of the future, but it gives you a basis and a clear image of what might happen next.
In simplified form, what happens next in the game is based on who touches the ball next; in which point you’ll have to predict the outcome of the current situation and take action accordingly. This statement is left vague because of the amount of options for a ball touch is next to limitless; But estimating what will happen next is much more simple when you know what absolutely cannot happen next, in addition it prepares you for upcoming events and you will not be caught off-guard.
Future situational awareness comes from judging players actions based on the three basics of player awareness (positioning, direction and momentum) and predicting their intentions in a simplified form. Good example is that you are at the goal, one of the opponents is on defensive position on their side, one of their players is going for the ball near the corner of your side, but the third player is driving towards your goal with supersonic speed. From such behavior you can assume he’ll more than likely head for a demolish, and if that is the case you’ll have plenty of time to avoid his attempt.
With simplified form, you can assess the situation and predict outcome of the next ball play, allowing you to position yourself accordingly even prior to the ball touch, preparing for what happens next. This does not mean that you necessarily take action prior to the first ball play, unless the situation allows it (ex. your team mate has the ball and you position yourself for a pass). But for example if you move to a position to intercept a pass before the pass is actually made, you can be certain that any skilled player does not just hand the ball over to you by making that pass anymore. Rule of the thumb is to assume that all players in higher levels of play are aware of each other’s positions and they all attempt to predict the game at least subconsciously to some level, and future situational awareness is the tool to use against them; perform a play that is outside their radar of predictions.
Future situational awareness can be used in planning your next move, example minimizing the downtime in your boost management. For example you see someone grab a boost capsule in your teams left corner, quickly glance at the clock, you’ll know the boost capsule will spawn approximately 10 seconds of that moment (this will be discussed in further detail at the boost management guide).
ROCKET LEAGUE – Guide to Boost Management
Pick-up based design
Boost management is one of the essential tools of every Rocket League player. This guide explains the background of the design and provides information regarding boost, its management and how to best utilize different aspects of it.
For Rocket League, boost is a pick-up based design, creating resource limitations that are positional. The boost does not refill by itself, and can only be gained via pick-ups (either pads or capsules) that can be found on the field. This creates an aspect of field positioning. Certain styles of positioning yourself on the map allow for more convenient paths to gather boost. Below is a map of the field and its boost positions:
• Blue dots represent a full charge capsule (100 boost, respawn time ~10 seconds)
• Yellow dots represent a small charge pad (12 boost, respawn time ~4 seconds)
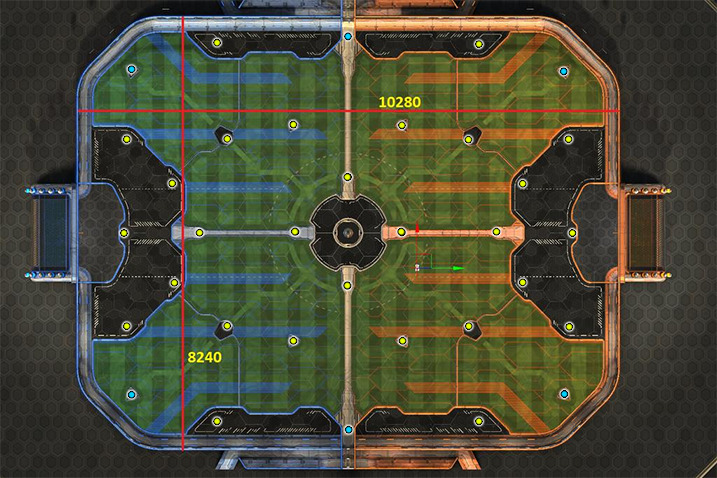
The lines and the figures (10280 and 8240 are measurement of length of the field in Unreal Units)
Players boost meter is 0-100 units. Each player starts with 34 units (1/3 of the boost meter) filled at every kick-off.
Basics of Boost Management
The methods of boost management are varied, however they all attempt to achieve the same goals:
• Maximizing your current boost amount for team
• Minimizing the downtime of refill for team
• Minimizing the current boost amount of opponents
• Maximizing the downtime of refill of opponents
Simplified, your aim is to have as high amount of boost as possible, whilst avoiding picking up unnecessary boost capsules in case your team mate is available to pick one up. The offensive part of boost management is boost denying, in which case you attempt to make sure that whilst you play, you negate opponent’s chances of picking up boost (especially the 100 capsules, since they refill boost to maximum, and they have the lowest respawn rate). Managing to completely starve your opponents of boost is difficult, but if successful, your team can apply massive amount of pressure on your opponent, typically resulting in a goal.
When you start positioning on the map, try to drive in a way that if you are not in need of a boost capsule, drive along the boost pads (as shown on the map, they are everywhere), this way you can keep your position whilst refilling boost, since each time you go for a 100 capsule, you create a gap in your positioning, as the capsules are located at the corners of the map. This means only go for the boost capsules in case it is absolute necessity to do so, and there is a timeframe which allows you to do so. Players often blindly aim for the boost capsules, even if their boost was at example 50, which isn’t a requirement, only few situations require you to spend the whole boost meter, and you can quickly refill yourself up by just driving over few boost pads.
A good rule of a thumb is to have 12 boost available at all times (boost worth of 1 pad), as it allows a small aerial and the capability to block any incoming shot towards the goal. The absolute worst case scenario of boost management is to be completely starved of boost (less than 6) in which case you cannot use boost even for the slightest speed increase.
If as a player you find yourself being out of boost a lot (The aim of boost management is to make sure it never happens), there are few, if not multiple things you do inconsistently, or you as a player do not manage your boost, which is a simple necessity.
Tips & Tricks
• Your car will not go faster once you reach supersonic, once you reach supersonic avoid using unnecessary amounts of boost (holding it down)
• Forward and backward dodges are a handy way to reserve boost, as they provide exponential speed increases and allow you to travel through the map quickly
• You move backwards as fast as you move forwards (both backward dodges and regular driving), however you cannot boost backwards. This however can be circled around by jumping backwards and doing an inverted, low aerial. So essentially flying backwards = boosting in reverse.
• Pay attention to the clock each time you see a boost capsule being picked up (especially at your end), this way you’ll know a good timeframe when the boost is about to respawn, once you master this technique you can pick them up by driving over them at the exact moment of their respawn, combined with good map awareness this gives you an edge you may possibly need in a match, in addition it allows greater chance of denying your opponent of boost
• Are you pressurized or on defense and cannot risk going to the corner to pick up an entire capsule? Fear not, there are plenty of boost pads available right next to your goal, and since their respawn time is low, you can pick them up repeatedly as a last resort
• Learn to drive along the boost pads, once this process becomes automated you have much lesser chance of ever being low on boost
• Boost is a necessity for majority of plays, think before you use it
ROCKET LEAGUE – STRATEGY GUIDE – THE ART OF DOUBLES
The intention behind this strategy guide is to discuss Doubles, 2 versus 2 as a game mode, establish basis on the essential baseline strategies and create a meta-level analysis, in order to provide its readers with insight on the game mode and provide a deeper level of knowledge. As such the text is not intended as an educational tool for beginners, but an attempt to provide more of an additional insight to expert players who have already mastered all the basics.
Defining doubles as a game mode
Doubles is potentially the most demanding out of all game modes due to its heavy reliance on positioning, and as such requires constant evaluation of the situation from the future-oriented perspective. Players need to be aware of all the potential situations which might lead to a goal, and position in advance to close those gaps, and at the same time attempt to establish ball control in order to gain the offense. Much like in one versus one, offense focuses on attempt to remove your opponents from play. As such doubles is a mix of one versus one’s punishment-game, where you attempt to capitalize on your opponents mistakes by throwing them out of the play and position based three versus three’s tempo- based pressure oriented game.
Due to having only two players on the field for each side, there’s more room for ball control, and as such ball control should always be capitalized. The most common mistake for players is the unnecessary forfeit of ball control, when in essence the whole game mode is based on maintaining the control of the match.
Establishing of ball control
Ball control is typically gained either via forfeiture or intercept. Forfeiture means the opponents give up on the ball, and begin position themselves on the defense. Ball control gained via means of intercept is by making a touch on the ball whilst opponents possess the control, thus the ball ends up in defending teams control. Ball control is one of the most crucial aspects of doubles, and when the control is gained, the controlling team should attempt to build offense; Remove opposing team member, or members from play in order to gain a gap in the defense that allows them to score. As by standard players position in future-oriented perspective, as such moving the ball to a location where its easily accessed by the opposing team means immediate forfeiture of ball control, and as such should be avoided at all costs. If ball control is not immediately contested, the team on offense has time to construct a scenario that more than likely results in a goal. As such ball control should be contested immediately when the situation favors it. Players should never challenge ball control on the terms of the offensive team, but on the situations that favor the defender.
Challenging and 50/50’s
Challenging as a term in this text refers to a situation where a defending teams member attempts to intercept the ball from the opposing team; it differs from 50/50 in such way that intercept can happen regardless of immediate presence of opposing teams member. 50/50’s as a term is used to describe a situation where two players collide on the same time, or almost immediately after a ball touch from either team’s player.
Patience is a virtue as a saying translates perfectly to ball challenging and 50/50’s. It is not uncommon for players to extend their aggression in order to challenge a ball that is in heavily favor of the opposing team, as such the chances of losing the challenge are greater; This is especially critical for the defending team, as if challenge is lost, it typically leads to out-positioning of a team member, thus its suggestable that over-aggression is not commonly used, but rather saved for the desperate measures where player considers no other future situation feasible. The defending team needs to pick a moment where challenging the ball favors their team, and the chances of intercept are high. The offensive team should attempt to enforce defending team to extend their aggression for situations where their challenges are weak, and as such easily won. Capitalizing on opponent’s over-aggression is one of the key aspects in gaining access to a situation where goals can be made with little or no resistance from the defending team.
Results of 50/50’s can be placed in three categories: win, draw and loss. Winning a 50/50 means the ball control either remains or is gained by the team, drawing means that the ball control does not change immediately after the collision, losing means the ball control is lost or not gained as a result of the 50/50. As it is for challenges, the defending team needs to wait for a situation where the chances of winning a 50/50 are high, since either drawing or losing the 50/50 translates to opponents keeping the ball control, and typically out-positioning the other defending member. However, drawing is sometimes a valid strategy if the defending teams other member has the means to gain access to a better situation to challenge the ball or a high possibility of intercept. However this puts the defending team at risk, if the challenge fails, both players are out-positioned, and as such in heavy disadvantage to defend their goal.
In offense, i.e. the team who maintains ball control, the only 50/50 they should avoid is a situation where the offensive teams member suspects they might lose the 50/50, as drawing allows them to retain the ball control. If such 50/50 is suspected to happen, it’s better for the offensive teams member to forfeit the 50/50, as typically a defending member challenging the ball has no time to react to the fact that the ball is suddenly forfeited, resulting in a scenario where the ball is placed in a location not intended by the defending team, allowing the offensive team to retain the ball control and at best remove one or both defenders from play.
Positioning and Rotations
Positioning is the single most important aspect of Doubles, and unless both teams are on the same skill level of positioning, the victor is clear. The flow of the match requires constant evaluation and as such positioning should be always done in advance, not according to the current situation, but the most likely scenario from future-oriented perspective. Skill in positioning typically comes over time to every player, but even on the highest levels there are typical mistakes which players should avoid; The first being over-aggression of the defending team via positioning, where both members of the defending team are too high on the field, allowing a direct shot towards the goal which cannot be physically blocked by either of the teams members. As such it is required that the other defending teams member remains in the vicinity of the goal in a way that the player is capable of blocking any potentially incoming shot, as such blocking the scoring attempts and enforcing the opponents to move towards your goal, allowing the other defender to challenge the ball control. This is most easily done by sending the other team member back on the field in case your team has no ball control.
The second mistake is to place both defending players on the same position, where their only choice of defending the goal is to challenge the same ball, this typically leads to high disadvantage for the defender. This is most easily avoided by the other defender securing the goal whilst the other challenges the ball.
Rotations for defense is a crucial aspect. Rotations in this text describe a situation where players switch positioning and their intended roles for the positions. Immediately where a defending team’s member gets out-positioned in a way that challenging the ball is no longer feasible, the player should retreat to the goal in order to allow the other defender to challenge the ball whilst the defending team’s goal remains secure. Secured goal in this text is used to describe a situation where any incoming shot from that current situation can be reached and blocked by the defending team’s member.
The offensive teams positioning can be categorized into two roles: The ball controller and the support. The ball controller keeps positioning in order to maintain the ball control until a pass or an attempt for goal can be made, the support aligns in order to be capable of reaching a pass to either become the ball controller, attempt a goal or in case of potential loss of ball control retreats to defense in order to secure the goal. The supporting offensive members positioning is the most difficult role, as player must predict correctly the future situation or their team is placed on disadvantage. As such in case the supporting player is not sure of the outcome of the situation, the player should always remain in position which allows securing of the goal in case ball control is lost. Rotations for offensive team typically happen via a pass of ball control or if the ball control is not challenged players can switch the roles via passing of the ball control. The ball controller always becomes the support when in no longer in close vicinity of the ball.
Boost Management
Boost management in Doubles by standard requires evaluation when the gathering of the boost is feasible. The goal must remain secured whilst players attempt to refill the boost as defenders. For team on offense the support must always maintain the position and only extend or create a gap in the positioning when the situation allows it. The ball controller can access boost by moving the ball in directions that allow the player to gather boost.